To Create an Occupancy Estimation with Occupancy Estimator
-
Start the
Occupancy Estimator command
 .
.
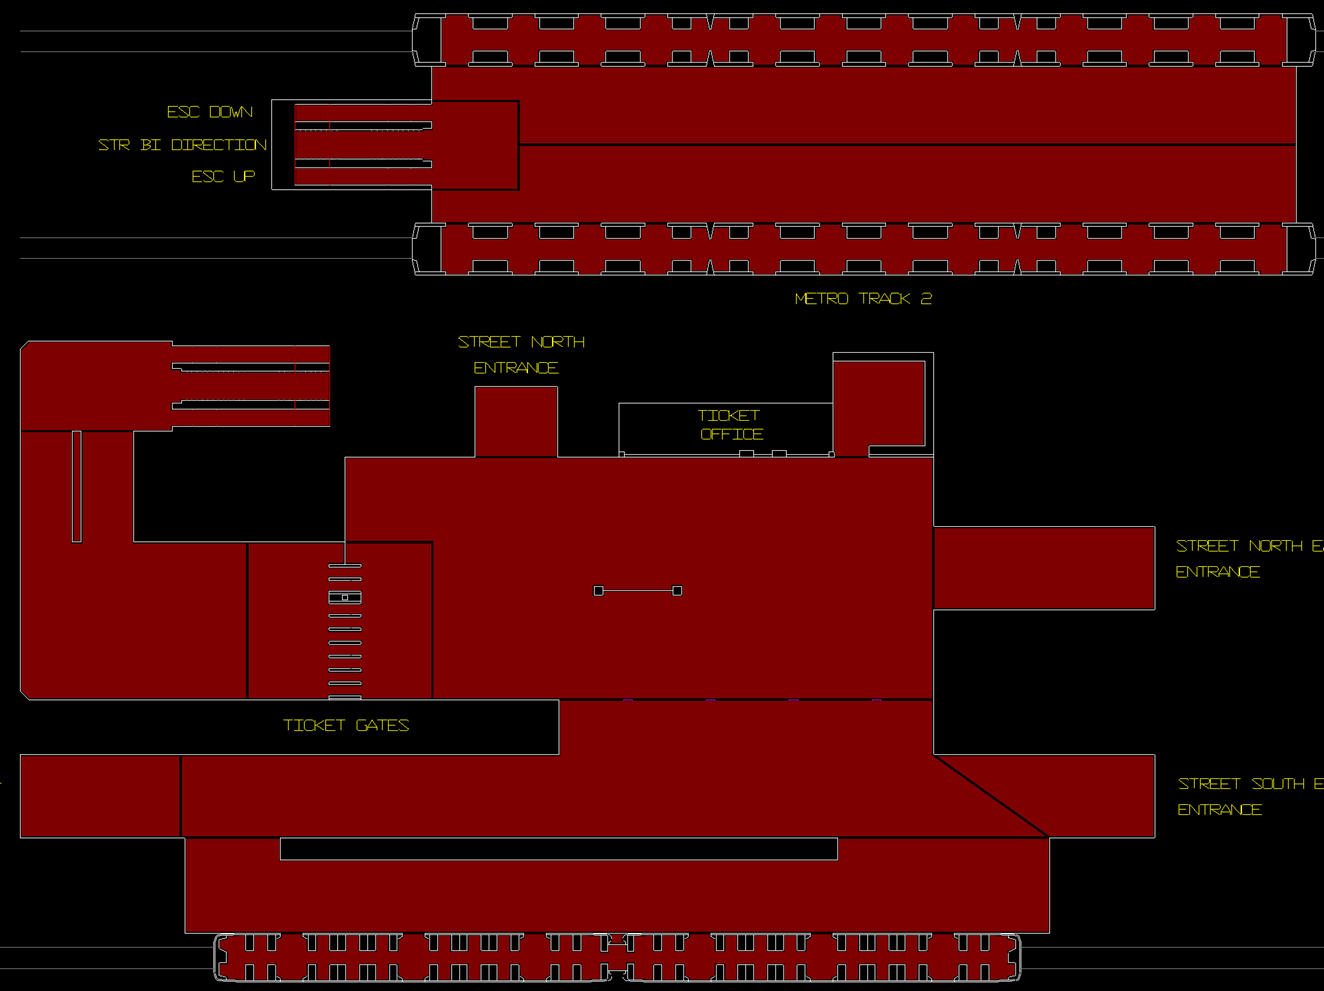
A model having accessible spaces is required.
-
When the command starts, you have the option to demarcate your
distinct pedestrian spaces, or skip this phase and just use the model's
accessible spaces (command prompt:
"Demarcate discrete regions. Click first point:")
Press <Enter> to skip this phase and estimate occupancy based on the model's accessible spaces.
Click the start of the first demarcation to begin demarcating distinct pedestrian spaces. Use of snaps is recommended for accurate demarcation. Occupancy Estimator can snap to any visible, snapable CAD, and supports these snaps.
A demarcation is a series of one or more line-segments, marking the boundary between two pedestrian Spaces. Multiple demarcations are permitted.
When demarcating Spaces, consider all the different pedestrian areas in the model. Also consider demarcating parts of the model that aren't interesting, or where occupancy estimation is not required.
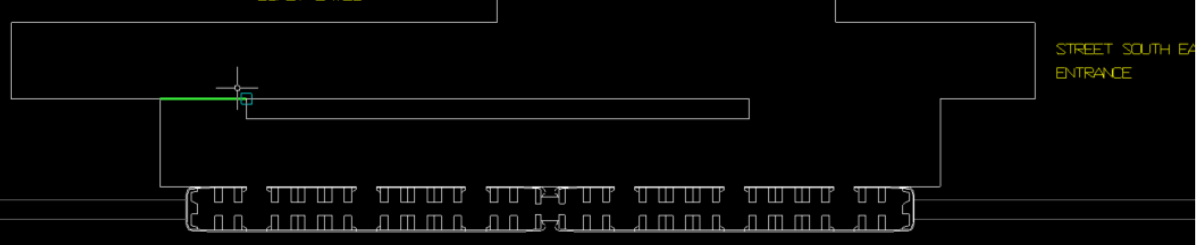
For instance, train carriage interiors have a known maximum occupancy, so do not need to be estimated.
- Click the first point of the first demarcation. As the mouse moves, a demarcation segment is drawn from the first point to the mouse cursor.
- Click the next point along the demarcation. To add more points, click to create them. The demarcation expands to include them. To finish this demarcation, press <Enter> (command prompt: "Demarcate discrete regions: Click next point, press <Enter> to finish this demarcation.")
- Add more demarcations if required (command prompt: "Click a demarcation grab/segment to modify it; click off-grab to start new demarcation. Press <Enter> to finish all demarcations.")
-
Existing demarcations can be edited between drawing new
demarcations. Edit handles are presented on all demarcation vertices.
-
Move vertex.
- Mouse-over a vertex edit handle. The mouse cursor automatically snaps to the edit handle.
- Clicking an edit handle selects it and enters the vertex movement phase (command prompt: "Move demarcation vertex: click to drop.")
- Move the mouse to adjust the position of the vertex. The demarcation changes automatically.
- Click at the desired location to set the new vertex position.
- Add/insert vertex.
-
Delete vertex.
- Mouse-over a demarcation vertex and right click. The segment highlights when the mouse is over it.
- If a demarcation has more than 2 vertices, the right-click menu includes a Delete vertex option. Select that menu option to delete the vertex.
- After the vertex is deleted, the demarcation and edit handles update to the new shape.
-
Delete segment.
- Mouse-over a demarcation segment, and right click. The segment highlights when the mouse is over it.
- If the demarcation has more than 1 segment, the right-click menu includes a Delete segment option. Select that menu option to delete the segment.
- After the segment is deleted, the demarcation and edit handles update to the new shape.
- Delete demarcation.
-
Move vertex.


- Where spaces have been defined in a previous session, these actions will invalidate those spaces:
- When spaces are invalidated, their records and all occupancy settings/estimates are removed from the model.

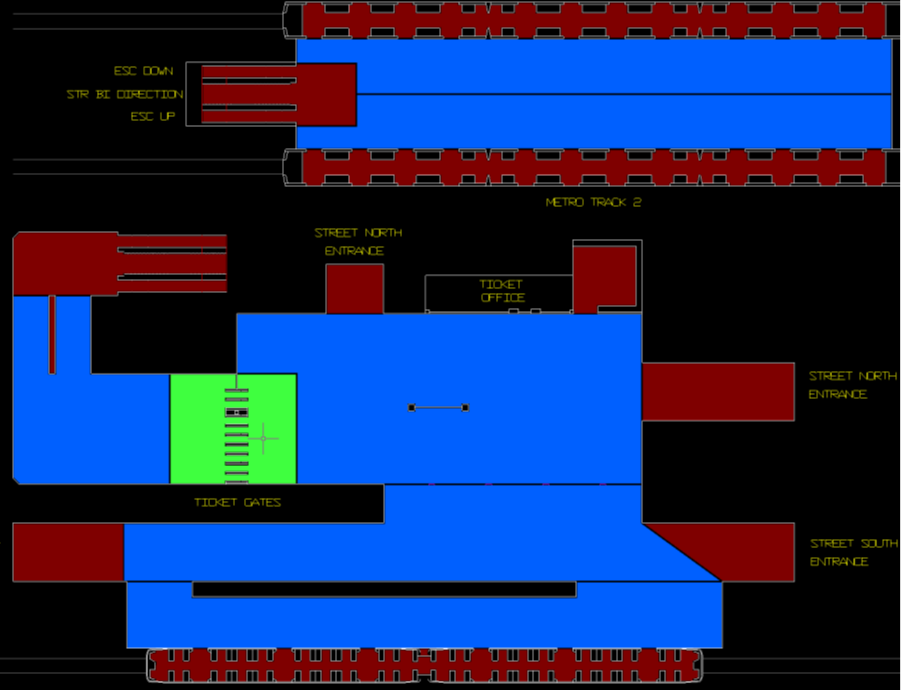
All Spaces created by the demarcations are shown.
- Red Spaces are unidentified
- When the mouse cursor is over a Space, it is highlighted in green
- Identified Spaces are drawn blue
-
Identify any Spaces you wish to estimate
occupancy for. You don't need to identify all the Spaces.
Identifying a Space means giving it specific characteristics
- A Name to identify the space.
- Social distancing to apply in the occupancy estimate.
- Occupancy Rating
- Capacity Factor
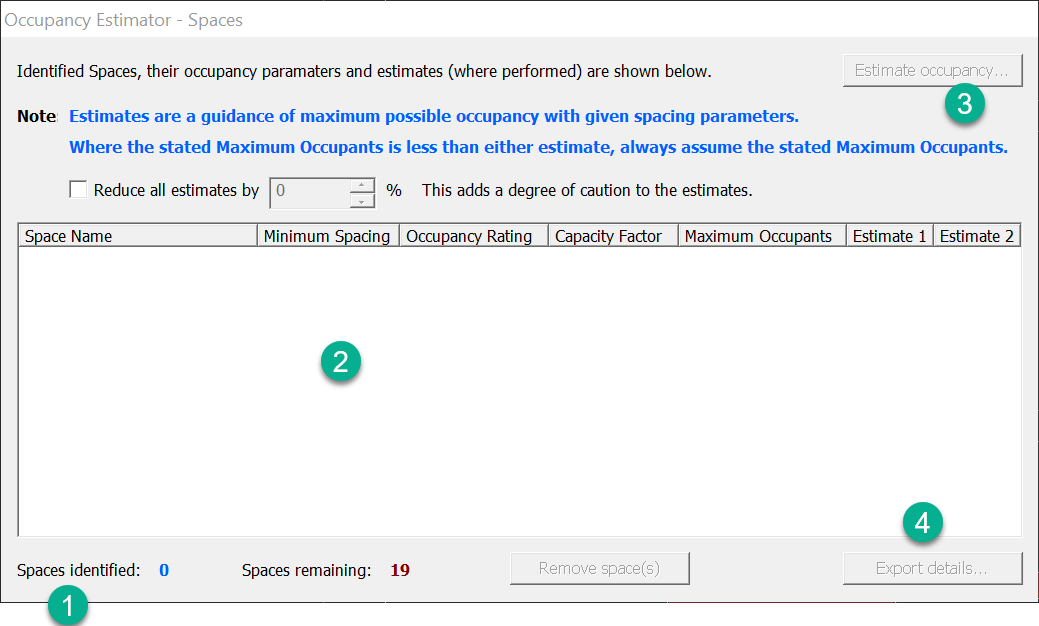
Note: Occupancy Rating and Capacity Factor combine to give an overall Maximum Occupancy for the Space.The Occupancy Estimator - Spaces dialog shows all identified Spaces, their characteristics, and their occupancy estimates.
-
Identify a Space by placing the mouse over
it and left-click.
Clicking in a space opens the Identify Space dialog.
- Give the space a name, social distance, Occupancy Rating and Capacity Factor.
- Select "Unknown" if Capacity Factor is not known or is not important.
- The dialog calculates and show Maximum Occupancy from the Occupancy Rating and Capacity Factor.
- The Social distance is unit-aware. You may enter Imperial distance units in feet and inches.
- Social distance value and Capacity Factor persist for newly identified Spaces.
- Click in an already identified Space to show the settings for that Space, which allows you to change them.
-
Identify each Space for which you want to estimate occupancy.
The Occupancy Estimator - Spaces dialog lists details for each area.
Where a Space has unknown Occupancy Rating, "Unknown" is listed for its Occupancy Rating and Maximum Occupants.
Where occupancy has not been estimated, "n/a" is listed for Estimate 1 and Estimate 2.
-
Remove a Space identity, select its row in the dialog, and click
the
Remove space(s).
This button is disabled when no Spaces are selected.
-
Click
Estimate occupancy… to estimate the occupancy
of the identified Spaces.
The dialog lists the estimates for all the identified Spaces.
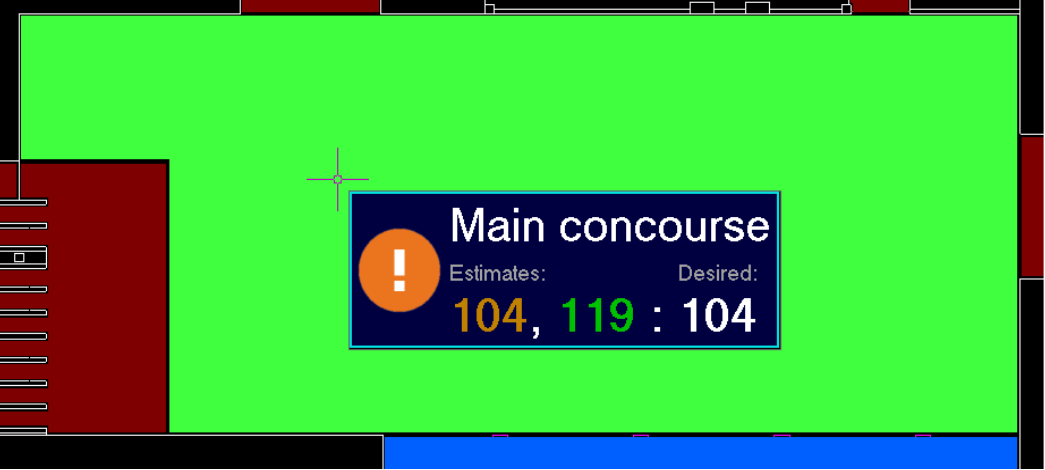
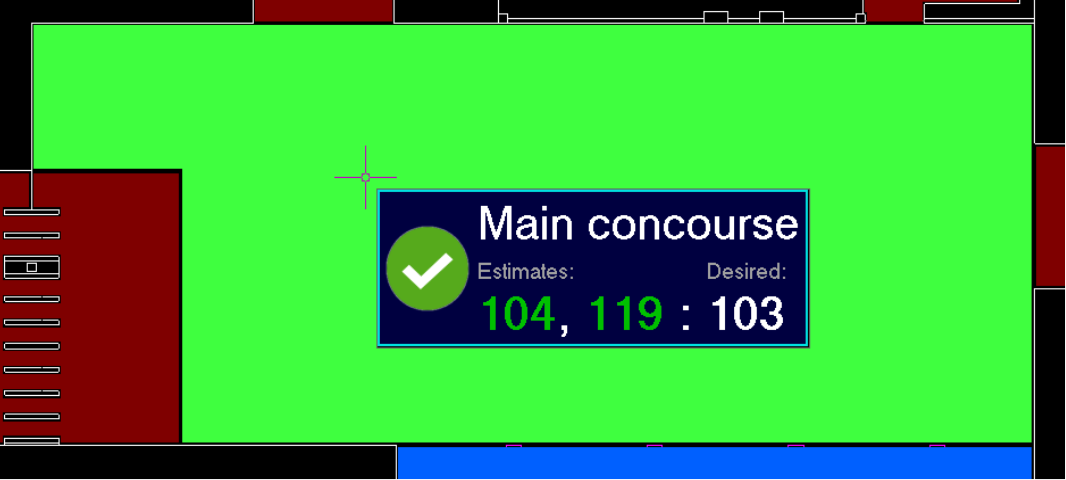
Estimates are color coded:
- Black when Maximum Occupants is unknown, and there is nothing to compare against.
- Red when an estimate is below the Maximum Occupants value which means it is under-provisioned for the desired number of people.
- Amber when an estimate is exactly equal to the Maximum Occupants value. The Space may be exactly-provisioned for the desired number of people.
- Green when an estimate is above the Maximum Occupants value which means the Space is over-provisioned for the desired number of people.
- This shows how desired capacity compares to theoretical capacity.
-
Position the mouse over an identified, estimated Space., :
A tool tip appears showing the occupancy estimates and comparison state.
Where Occupancy Rating is unknown, the tool tip looks like this:
The Occupancy Estimate color coding in the tool tip matches the Spaces dialog, except when the Occupancy Rating is unknown in which case the text is white and not black.
The tool tip displays a Status icon, to give you a quick recommendation about the space:
- A Green Check indicates the Space should hold more socially-distanced people than the Maximum Occupancy.
- An Amber Exclamation indicates the Space might not hold more socially-distanced people than the Maximum Occupancy.
- A Red X indicates the Space can not hold more socially-distanced people than the Maximum Occupancy.
The Status icons are calculated as follows:


Example

The low estimate is still under-provisioned, but the high estimate is over-provisioned. This state is reflected in the tool tip:

Reducing the Occupancy Rating further, to 130 people results in:

Estimate 1 is exactly-provisioned, and Estimate 2 is still over-provisioned. Again the tool tip reflects this.
Finally, reducing the Occupancy Rating by one person, down to 129 people:

-
Identified estimated Spaces can
show their estimation work. To view this do
the following:
-
Mouse-over an identified, estimated Space and right-click.
Two menu options appear for the Space.
-
Click
Show Estimate 1 Details to show the square
tessellation.
The command prompt changes to: "Review estimate 1details for selected Space; press <Enter> to resume Space identification."
-
Click
Show Estimate 2 Details to show the
hexagonal tessellation.
The command prompt changes to: "Review estimate 2 details for selected Space; press <Enter> to resume Space identification."
-
-
-
Mouse-over an identified, estimated Space and right-click.


Estimate Display Observations
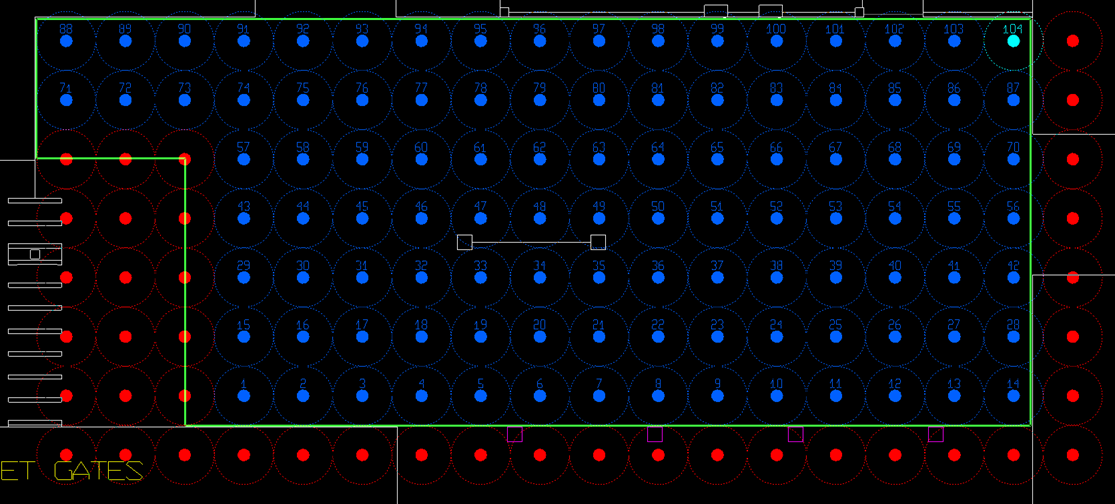
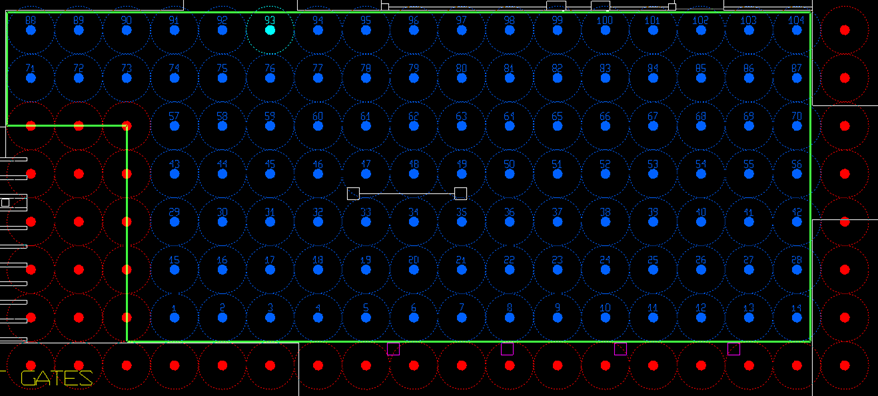
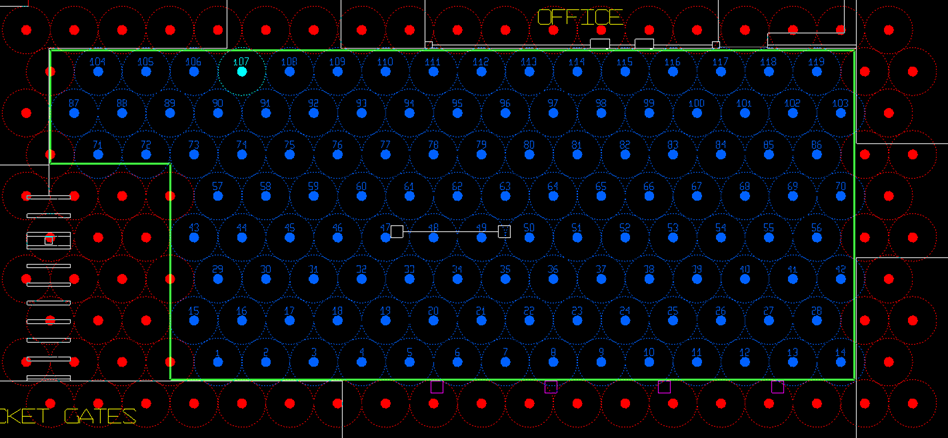
For both estimates, the outline of the Space is shown in green.
Counted circles are numbered. The circle corresponding to the estimate count is show in light-blue, to highlight it.
-
To hide the estimate display, do one of the following:
The command returns to the Identify Spaces phase.
Reduced Estimates
When estimates are reduced, the estimate details display is slightly different.
Now, the light-blue circle shows the estimate highlights the counted circle for the reduced estimate.
- (Optional)
Export Space characteristics and occupancy estimates to an Excel
file.
Three file formats are supported: XLSX, XLS, CSV.
Data is formatted like this:
To export the estimates, click the Export details… button.
Then in the file dialog, specify the location for the exported details.
-
Press <Enter> again to complete the command.
Demarcations and Space identities are saved in the model's LGM file.
- To modify demarcations or Space identities, run the Occupancy Estimator again.